文章内容完善中……
前言
作者是一名赛尔号PVP玩家,最近胜率一直不高,因此决定制作一款巅峰辅助工具。
本人此前从未接触过网络通信这一块,基本是现学现用,因此可能会存在部分问题,还望大佬们指出!
本文所用工具如下:
| 工具 |
描述 |
| Fiddler Classic |
抓包工具 |
| JPEXS Free Flash Decompiler |
Flash文件反编译工具 |
| x64dbg |
程序调试器 |
项目开源地址:https://github.com/dauphinYan/SeerAssistant
获取Flash文件并反编译
本阶段用到的工具:Fiddler Classic、JPEXS Free Flash Decompiler。
这部分暂时跳过…(可以参考文末链接)
反编译成功后,我们会得到下述四个文件夹:
1
2
3
4
| Client
RobotAppDLL
RobotCoreDLL
TaomeeLibrary
|
尝试读源码!
通信数据解密
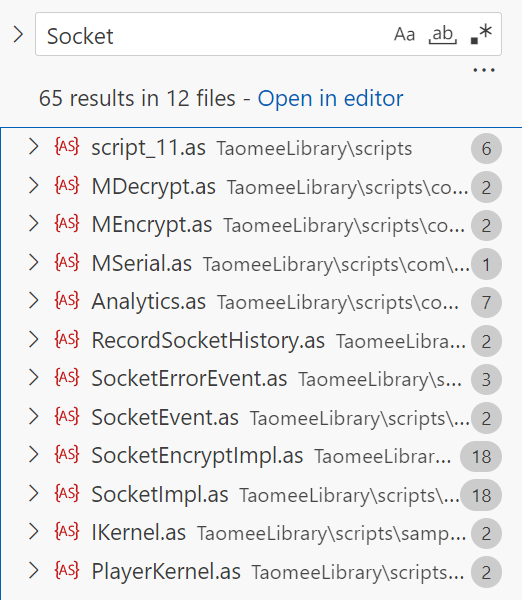
我们可以在前面反编译得到的TaomeeLibrary文件夹中搜索socket,毕竟网络通信都需要使用到socket,所以可以使用这种方法快速接近目标。然后,我们发现了十分显眼的MDecrypt.as,赶快进去瞧瞧!
可以看到MDecrypt.as的主要函数为:
1
| public function MDecrypt(param1:ByteArray, param2:int, param3:ByteArray) : void
|
因此我们需要弄清传入的三个参数对应的含义。
同样,在TameeLibrary文件夹中搜索MDecrypt(,这里有一个技巧,在末尾添加(就可以快速找到该函数在哪里实现以及调用。
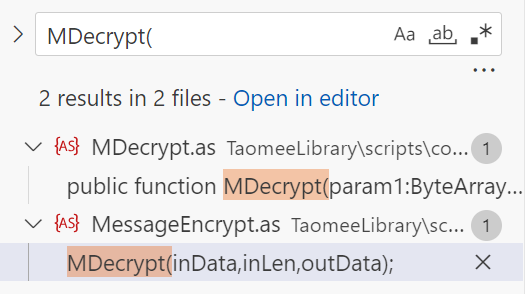
现在可以清楚的看到在MessageEncrypt.as中有调用,我们进去看看。
1
2
3
4
5
6
7
8
9
10
11
12
13
| private static var NO_ENCRYPT_LEN:int = 4;
public static function decrypt(inData:ByteArray) : ByteArray
{
var inLen:int = inData.readUnsignedInt() - NO_ENCRYPT_LEN;
var outData:ByteArray = new ByteArray();
outData.writeUnsignedInt(0);
MDecrypt(inData,inLen,outData);
outData.position = 0;
outData.writeUnsignedInt(outData.length);
outData.position = 0;
return outData;
}
|
通过这个函数实现,可以大胆猜测:
InData:传入的数据包。inLen:真正需要解密的部分。outData:解密后的数据包。NO_ENCRYPT_LEN:记录数据包的长度信息。(这里大胆猜测,前四字节为包体长度)
为什么这么猜测呢?因为数据在传递的过程中,数据不是逐字节的发送的,而是以数据包的形式成批发送,那么发送方为了让接收方区分接收到的数据,通常会在数据包头部保留明文片段用于标识数据包的长度。
MDecrypt.as源码可读性比较差,有兴趣可以自行阅读分析,使用C++重写的源码可见下方。
C++重写后的解密源码:
1
2
3
4
5
6
7
8
9
10
11
12
13
14
15
16
17
18
19
20
21
22
23
24
25
26
27
28
29
30
31
32
33
34
35
36
37
38
39
40
41
42
| std::vector<uint8_t> Cryptor::Decrypt(const std::vector<uint8_t> &Cipher)
{
size_t len = Cipher.size();
if (len == 0 || Key.empty())
return {};
int result = Key[(len - 1) % Key.size()] * 13 % len;
std::vector<uint8_t> rotated = Merge(
Slice(Cipher, len - result, len),
Slice(Cipher, 0, len - result));
std::vector<uint8_t> plain(len - 1);
for (size_t i = 0; i < len - 1; ++i)
{
plain[i] = static_cast<uint8_t>((rotated[i] >> 5) | (rotated[i + 1] << 3));
}
size_t j = 0;
bool NeedBecomeZero = false;
for (size_t i = 0; i < plain.size(); ++i)
{
if (j == 1 && NeedBecomeZero)
{
j = 0;
NeedBecomeZero = false;
}
if (j == Key.size())
{
j = 0;
NeedBecomeZero = true;
}
plain[i] = static_cast<uint8_t>(plain[i] ^ Key[j]);
++j;
}
return plain;
}
|
不过有一点需要注意,在官方的源码中
1
| _loc11_ = CModule.mallocString(getDefinitionByName("com.robot.core.net.SocketConnection").key);
|
_loc11_在很多处都有参与运算,因此我们需要弄清楚这个值是怎么来的。
根据路径找到SocketConnection.as,发现关键函数key():
1
2
3
4
5
6
7
8
9
10
11
12
13
14
15
16
17
18
19
20
21
22
23
| private static var _encryptKeyStringArr:Array;
public static function get key() : String
{
var _loc2_:int = 0;
var _loc3_:String = null;
var _loc1_:String = "";
if(_encryptKeyStringArr == null)
{
_loc1_ = "!crAckmE4nOthIng:-)";
}
else
{
_loc2_ = 0;
while(_loc2_ < _encryptKeyStringArr.length)
{
_loc3_ = StringUtil.replace(_encryptKeyStringArr[_loc2_],"*","");
_loc1_ += _loc3_;
_loc2_++;
}
}
return _loc1_;
}
|
不难知道,默认情况下key的值为!crAckmE4nOthIng:-),这个密钥看着很像某些单词的缩写,简单解读一下。
crAckmE:Crack me.4:for.nOthIng:Nothing.
连起来也就是:
1
| Crack me for nothing. 试着破解我吧,反正也没啥有用的东西😊
|
这里感谢”圆圆圆“提供的解释。
显然,这个key在后面肯定会被修改,我们在这个文件中又找到的修改函数:
1
2
3
4
| public static function setEncryptKeyStringArr(param1:Array) : void
{
_encryptKeyStringArr = param1;
}
|
因此在文件夹中搜索setEncryptKeyStringArr(,得到结果如下图所示:
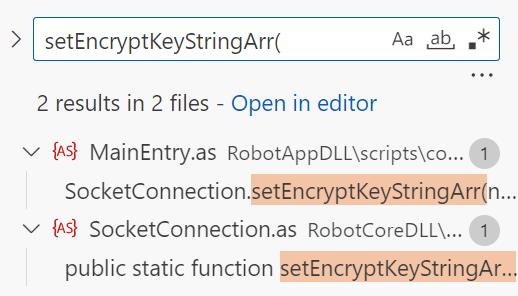
只找到一处该方法的调用,和我们的预期有所差距:
1
2
3
4
5
6
7
8
9
10
11
12
13
14
15
16
17
18
19
20
21
22
23
24
25
26
27
28
29
30
| private static function onSocketClose(param1:Event) : void
{
var event:Event = param1;
DebugTrace.show("////////////////////////////////////////////////////////////////////////////////\r//\r//\t\t\t\t" + "socket was closed\r//\r////////////////////////////////////////////////////////////////////////////////");
try
{
SocketConnection.mainSocket.removeEventListener(Event.CLOSE,onSocketClose);
SocketConnection.setEncryptKeyStringArr(null);
SocketConnectionHelper.clear();
ModuleManager.hideAllModule();
if(login10004)
{
return;
}
Alarm.show("此次连接已经断开,请重新登录",function():void
{
if(ExternalInterface.available)
{
navigateToURL(new URLRequest("javascript:window.location.reload();"),"_self");
}
else
{
navigateToURL(new URLRequest("https://seer.61.com"),"_self");
}
},false,true,false,LevelManager.stage);
}
catch(e:Error)
{
}
}
|
可以看到这部分发生在与游戏服务器断开的阶段,并没有达到修改key的目的,现在就比较麻烦了。
既然如此,那我们先去开一把休息一下,羁绊后的伽马强度还是太爆炸了……
数据包格式解析
在找key之前呢,可以先看看官方是如何解析数据包的,前面我们知道MessageEncrypt.as有一个decrypt(函数,很明显,这是一个套壳函数,没有解析数据的具体实现。因此文件夹中搜索decrypt(,可以定位到SocketEncryptImpl.as,其中包含一个函数:
1
2
3
4
5
6
7
8
9
10
11
12
13
14
15
16
17
18
19
20
21
22
23
24
25
26
27
28
29
30
31
32
33
34
35
36
37
| private function onData(e:Event) : void
{
var msgLen:int = 0;
var ba:ByteArray = null;
DebugTrace.show("socket onData handler....................");
this._chunkBuffer.clear();
if(this._tempBuffer.length > 0)
{
this._tempBuffer.position = 0;
this._tempBuffer.readBytes(this._chunkBuffer,0,this._tempBuffer.length);
this._tempBuffer.clear();
}
readBytes(this._chunkBuffer,this._chunkBuffer.length,bytesAvailable);
this._chunkBuffer.position = 0;
while(this._chunkBuffer.bytesAvailable > 0)
{
if(this._chunkBuffer.bytesAvailable > MSG_FIRST_TOKEN_LEN)
{
msgLen = this._chunkBuffer.readUnsignedInt() - MSG_FIRST_TOKEN_LEN;
if(this._chunkBuffer.bytesAvailable >= msgLen)
{
this._chunkBuffer.position -= MSG_FIRST_TOKEN_LEN;
ba = MessageEncrypt.decrypt(this._chunkBuffer);
this.parseData(ba);
}
else
{
this._chunkBuffer.position -= MSG_FIRST_TOKEN_LEN;
this._chunkBuffer.readBytes(this._tempBuffer,0,this._chunkBuffer.bytesAvailable);
}
}
else
{
this._chunkBuffer.readBytes(this._tempBuffer,0,this._chunkBuffer.bytesAvailable);
}
}
}
|
在解密函数的下方,有一个ParseData函数,翻译过来就是”解析数据“。那么我们定位到那里去:
1
2
3
4
5
6
7
8
9
10
11
12
13
14
15
16
17
18
19
20
21
22
23
24
25
26
27
28
29
30
31
32
33
34
35
36
37
38
39
40
41
42
| private static const HEAD_LENGTH:uint = 17;
private function parseData(data:ByteArray) : void
{
var info:ByteArray = null;
var tmfClass:Class = null;
this._packageLen = data.readUnsignedInt();
if(this._packageLen < HEAD_LENGTH || this._packageLen > PACKAGE_MAX)
{
this.readDataError(0);
dispatchEvent(new SocketErrorEvent(SocketErrorEvent.ERROR,null));
data.readBytes(new ByteArray());
return;
}
this._headInfo = new HeadInfo(data);
if(this._headInfo.cmdID == 1001)
{
this._result = this._headInfo.result;
}
DebugTrace.show("<<Socket[" + this.ip + ":" + this.port.toString() + "][cmdID:" + this._headInfo.cmdID + "]",getCmdLabel(this._headInfo.cmdID));
if(this._headInfo.result > 1000)
{
this.readDataError(this._headInfo.cmdID);
this.dispatchError(this._headInfo.cmdID,this._headInfo);
dispatchEvent(new SocketErrorEvent(SocketErrorEvent.ERROR,this._headInfo));
return;
}
this._dataLen = this._packageLen - HEAD_LENGTH;
if(this._dataLen == 0)
{
this.readDataError(this._headInfo.cmdID);
this.dispatchCmd(this._headInfo.cmdID,this._headInfo,null);
}
else
{
info = new ByteArray();
data.readBytes(info,0,this._dataLen);
tmfClass = TMF.getClass(this._headInfo.cmdID);
this.readDataError(this._headInfo.cmdID);
this.dispatchCmd(this._headInfo.cmdID,this._headInfo,new tmfClass(info));
}
}
|
可以看到,Debug输出与_headInfo有关,那么同样的方式,我们定位到HeadInfo
1
2
3
4
5
6
7
8
| public function HeadInfo(headData:IDataInput)
{
super();
this._version = headData.readUTFBytes(1);
this._cmdID = headData.readUnsignedInt();
this._userID = headData.readUnsignedInt();
this._result = headData.readInt();
}
|
再次阅读代码,现在封包的结构就十分明确了:
1
2
3
4
5
6
7
|
this._packageLen = data.readUnsignedInt();
this._headInfo = new HeadInfo(data);
this._dataLen = this._packageLen - HEAD_LENGTH;
|
这里补充一下,我们会发现在parseData()函数中,有一处命令ID的判断:
1
2
3
4
| if(this._headInfo.cmdID == 1001)
{
this._result = this._headInfo.result;
}
|
可以尝试在文件夹中搜索cmdID,接着我们会发现:
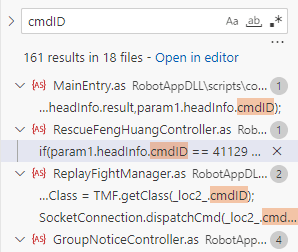
这里有一个cmdID的值为41129,接着我们继续搜索41129,然后我们会找到CommandID.as文件夹,这里面就包含了所有命令的ID,下面截取部分内容:
1
2
3
4
5
6
7
8
9
10
11
12
13
14
15
16
17
18
19
20
| package com.robot.core
{
public class CommandID
{
public static const LOADING_TIME_STAT:uint = 9303;
public static const GET_PET_TOWER_ACHIEVE:uint = 3453;
public static const RECEIVE_PRANKSTER_REWARD:uint = 1014;
public static const TOPFIGHT_RANKING_LIST:uint = 2459;
public static const TOPFIGHT_GET_AWARD:uint = 9374;
public static const TOPFIGHT_WEEK_WIN:uint = 2532;
public static const TOPFIGHT_BEYOND:uint = 2567;
}
}
|
找到这个文件的方法有很多,这里只列举其中一种,最开始找到这个文件的方法我忘记了,上述方法是临时找的。
找出修改Key的位置
回到这里,既然找不到修改key的位置,我们不妨先使用当前已经得到的解密算法对接收到的数据进行解密,这里选用Hook注入的方法(现在不清楚不用着急,后面会介绍的),解密得到的信息如下:
1
2
3
4
5
6
7
8
9
10
11
12
13
14
15
16
17
18
19
20
| [2025-07-03 15:22:54.849] [ThreadID 0xfb8] [Temp] [Hooked send] Parsed Data:[Length=17 Version=49 CmdID=111 Cmd=———— UserID=123456789 SN=0 BodySize=0]
[2025-07-03 15:22:54.874] [ThreadID 0xfb8] [Temp] [Hooked recv] Parsed Data:[Length=21 Version=0 CmdID=111 Cmd=———— UserID=123456789 SN=0 BodySize=4] Body=[00 00 00 00 ]
[2025-07-03 15:22:54.878] [ThreadID 0xfb8] [Temp] [Hooked send] Parsed Data:[Length=37 Version=49 CmdID=109 Cmd=SYS_ROLE UserID=123456789 SN=0 BodySize=20] Body=[a4 0e a7 cc 84 21 87 f2 f6 91 51 9a 7a 0e b7 6e ...]
[2025-07-03 15:22:54.903] [ThreadID 0xfb8] [Temp] [Hooked recv] Parsed Data:[Length=21 Version=0 CmdID=109 Cmd=SYS_ROLE UserID=123456789 SN=0 BodySize=4] Body=[00 00 00 00 ]
[2025-07-03 15:22:54.905] [ThreadID 0xfb8] [Temp] [Hooked send] Parsed Data:[Length=37 Version=49 CmdID=105 Cmd=COMMEND_ONLINE UserID=123456789 SN=0 BodySize=20] Body=[a4 0e a7 cc 84 21 87 f2 f6 91 51 9a 7a 0e b7 6e ...]
[2025-07-03 15:22:54.934] [ThreadID 0xfb8] [Temp] [Hooked recv] Parsed Data:[Length=561 Version=0 CmdID=105 Cmd=COMMEND_ONLINE UserID=123456789 SN=0 BodySize=544] Body=[00 00 0b 99 00 00 00 03 00 79 ec 33 00 00 00 02 ...]
[2025-07-03 15:23:06.439] [ThreadID 0xfb8] [Temp] [Hooked send] Parsed Data:[Length=141 Version=49 CmdID=1001 Cmd=LOGIN_IN UserID=123456789 SN=202 BodySize=124] Body=[a4 0e a7 cc 84 21 87 f2 f6 91 51 9a 7a 0e b7 6e ...]
[2025-07-03 15:23:06.989] [ThreadID 0xfb8] [Temp] [Hooked recv] Parsed Data:[Length=171 Version=62 CmdID=8002 Cmd=SYSTEM_MESSAGE UserID=123456789 SN=0 BodySize=154] Body=[00 01 88 43 68 66 2f da 00 00 00 8e 20 e7 b2 be ...]
[2025-07-03 15:23:06.995] [ThreadID 0xfb8] [Temp] [Hooked recv] Parsed Data:[Length=171 Version=62 CmdID=8002 Cmd=SYSTEM_MESSAGE UserID=123456789 SN=0 BodySize=154] Body=[00 01 88 43 68 66 2f da 00 00 00 8e 20 e7 b2 be ...]
[2025-07-03 15:23:06.996] [ThreadID 0xfb8] [Temp] [Hooked recv] Parsed Data:[Length=113 Version=62 CmdID=8002 Cmd=SYSTEM_MESSAGE UserID=123456789 SN=0 BodySize=96] Body=[00 01 88 43 68 66 2f da 00 00 00 54 e5 a6 82 e6 ...]
[2025-07-03 15:23:06.996] [ThreadID 0xfb8] [Temp] [Hooked recv] Parsed Data:[Length=129 Version=62 CmdID=8002 Cmd=SYSTEM_MESSAGE UserID=123456789 SN=0 BodySize=112] Body=[00 00 00 03 68 66 2f da 00 00 00 64 20 e4 bd a0 ...]
[2025-07-03 15:23:06.997] [ThreadID 0xfb8] [Temp] [Hooked recv] Parsed Data:[Length=25 Version=62 CmdID=3452 Cmd=LASTVALUE UserID=123456789 SN=0 BodySize=8] Body=[00 00 00 7f 00 00 00 32 ]
[2025-07-03 15:23:06.997] [ThreadID 0xfb8] [Temp] [Hooked recv] Parsed Data:[Length=25 Version=62 CmdID=3452 Cmd=LASTVALUE UserID=123456789 SN=0 BodySize=8] Body=[00 00 00 63 00 00 00 02 ]
[2025-07-03 15:23:06.997] [ThreadID 0xfb8] [Temp] [Hooked recv] Parsed Data:[Length=25 Version=62 CmdID=2394 Cmd=PET_BOOK_UPDATE UserID=123456789 SN=0 BodySize=8] Body=[00 00 05 1c 00 00 00 01 ]
[2025-07-03 15:23:06.998] [ThreadID 0xfb8] [Temp] [Hooked recv] Parsed Data:[Length=25 Version=62 CmdID=3452 Cmd=LASTVALUE UserID=123456789 SN=0 BodySize=8] Body=[00 00 00 2b 00 00 00 3c ]
[2025-07-03 15:23:06.998] [ThreadID 0xfb8] [Temp] [Hooked recv] Parsed Data:[Length=25 Version=62 CmdID=3452 Cmd=LASTVALUE UserID=123456789 SN=0 BodySize=8] Body=[00 00 00 2b 00 00 00 00 ]
[2025-07-03 15:23:06.998] [ThreadID 0xfb8] [Temp] [Hooked recv] Parsed Data:[Length=25 Version=62 CmdID=3452 Cmd=LASTVALUE UserID=123456789 SN=0 BodySize=8] Body=[00 00 00 2b 00 00 01 54 ]
[2025-07-03 15:23:06.998] [ThreadID 0xfb8] [Temp] [Hooked recv] Parsed Data:[Length=25 Version=62 CmdID=3452 Cmd=LASTVALUE UserID=123456789 SN=0 BodySize=8] Body=[00 00 00 2b 00 00 08 8b ]
[2025-07-03 15:23:06.999] [ThreadID 0xfb8] [Temp] [Hooked recv] Parsed Data:[Length=25 Version=62 CmdID=3452 Cmd=LASTVALUE UserID=123456789 SN=0 BodySize=8] Body=[00 00 00 2b 00 00 0a 31 ]
[2025-07-03 15:23:07.031] [ThreadID 0xfb8] [Temp] [Hooked recv] Parsed Data:[Length=3413 Version=62 CmdID=1001 Cmd=LOGIN_IN UserID=123456789 SN=46 BodySize=3396] Body=[0d b2 32 92 4d 71 dc 79 e7 89 9b e6 8e 92 00 00 ...]
|
这里只截取正常的部分(UserID我就用”123456”代替了),从接收到LOGIN_IN指令以后,数据变得非常奇怪,也就是说,key值的改变发生在接收到LOGIN_IN指令后!
在文件夹中搜索LOGIN_IN,结果不多,挨个查看下,最后锁定在MainEntry.as:
1
2
3
4
5
6
7
8
9
10
11
12
13
14
15
16
17
18
19
20
21
22
23
24
25
26
27
28
29
30
31
32
33
34
35
36
37
38
39
40
41
42
43
| private static function onLogin(param1:SocketEvent) : void
{
if(SaveUserInfo.loginIDInfo.loginType == 3)
{
StatManager.sendStat2014("手机验证码注册/登录","【手机验证码登录玩家】登录ONLINE服","手机验证码");
}
if(MainManager.isNewUser)
{
StatManager.sendStat2014("_newtrans_","fOnlineSucc","");
}
if(!isReconnect)
{
SocketConnection.removeCmdListener(CommandID.LOGIN_IN,onLogin);
EventManager.addEventListener(RobotEvent.CREATED_ACTOR,onCreatedActor);
}
else
{
SocketConnection.removeCmdListener(CommandID.RELOGIN_IN,onLogin);
}
var _loc2_:int = 0;
if(isReconnect)
{
_loc2_ = int(MainManager.actorInfo.mapID);
}
MainManager.setup(param1.data,isReconnect,_loc2_);
var _loc3_:ByteArray = param1.data as ByteArray;
var _loc4_:int = int(_loc3_.readUnsignedInt());
initKey(_loc4_);
MainEntry.login10004 = false;
LevelManager.openMouseEvent();
if(isReconnect)
{
MainManager.reconnectRequest();
EventManager.dispatchEvent(new Event(ReconnectCompleteController.RECONNECTSUC));
}
if(!isReconnect)
{
MapConfig.setup();
MapSeatPointConfig.setup();
}
sendSystemInfo();
SocketConnection.send(1022,86066824);
}
|
然后我们会发现一个特别显眼的函数:initKey(_loc4_)
1
2
3
4
5
6
7
8
9
10
11
12
13
14
15
16
17
18
19
20
21
| private static function initKey(param1:int) : void
{
var _loc2_:String = "c&o&m.--rob-ot.c--o-r-e.&n-et.S-oc-ke-t&C-on-n-e-c-t-i-on";
var _loc3_:* = "s*e*tE&&&n*c";
_loc3_ += "r*yp*t&&&&Ke*yS*tr*i&n&&g*Arr";
_loc2_ = StringUtil.replace(_loc2_,"-","");
_loc2_ = StringUtil.replace(_loc2_,"&","");
_loc3_ = StringUtil.replace(_loc3_,"*","");
_loc3_ = StringUtil.replace(_loc3_,"&","");
param1 ^= MainManager.actorInfo.userID;
var _loc4_:String = MD5.hash(param1 + "");
var _loc5_:* = MainManager.actorInfo.userID + "";
var _loc6_:Array = [];
var _loc7_:int = 0;
while(_loc7_ < 10)
{
_loc6_[_loc7_] = "*" + _loc4_.charAt(_loc7_) + "*";
_loc7_++;
}
getDefinitionByName(_loc2_)[_loc3_](_loc6_);
}
|
处理一下,就可以的得到:
1
2
| _loc2_ = "com.robot.core.net.SocketConnection";
_loc3_ = "setEncryptKeyStringArr";
|
这种避免直接通过字符串搜索的方法学到了!
发现没,_loc3_就是我们前面只能找到一处调用的方法setEncryptKeyStringArr。
制作我们自己的Hook
本文中有什么作用?
在本文中,我们的最终目的是对网络通信中的数据包进行解密,因此如何捕获数据非常重要。为了实现这一目的,就需要请出本节主角:Hook!
什么是Hook?
Hook,又称钩子,是一种能够拦截和修改函数或方法的技术。它允许开发者在不修改原有的代码前提下,修改程序的行为。
例如在网络通信中,我们通过我们通过Hook拦截网络API的调用,例如send、recv等,这样就可以捕获网络通信中的一段十六进制数据:
1
| 3c 3f 78 6d 6c 20 76 65 72 73 69 6f 6e 3d 22 31 2e 30 22 3f 3e 3c 21 44 4f 43 54 59 50 45 20 63 72 6f 73 73 2d 64 6f 6d 61 69 6e 2d 70 6f 6c 69 63 79 3e 3c 63 72 6f 73 73 2d 64 6f 6d 61 69 6e 2d 70 6f 6c 69 63 79 3e 3c 61 6c 6c 6f 77 2d 61 63 63 65 73 73 2d 66 72 6f 6d 20 64 6f 6d 61 69 6e 3d 22 2a 22 20 74 6f 2d 70 6f 72 74 73 3d 22 2a 22 20 2f 3e 3c 2f 63 72 6f 73 73 2d 64 6f 6d 61 69 6e 2d 70 6f 6c 69 63 79 3e 00
|
将其转换为ASCII字符就可以得到:
1
2
3
4
5
| <?xml version="1.0"?>
<!DOCTYPE cross-domain-policy>
<cross-domain-policy>
<allow-access-from domain="*" to-ports="*" />
</cross-domain-policy>
|
当然了,这个肯定是我们不需要的数据。
总的来说,Hook在本文的作用就是捕获我们需要分析的数据包。
Hook选择
一般情况下,Hook都是以DLL的形式注入到进程中,然后对进程进行修改,所以我们也需要制作DLL文件。
考虑到使用Windows原生API实现Hook难度不小,因此本文采用第三方开源库MinHook。
链接:https://github.com/TsudaKageyu/minhook
MinHook的实现就非常方便了,大致流程如下:
1
2
3
4
5
6
7
8
9
10
11
12
13
14
|
MH_STATUS WINAPI MH_Initialize(VOID);
MH_STATUS WINAPI MH_CreateHook(LPVOID pTarget, LPVOID pDetour, LPVOID *ppOriginal);
MH_STATUS WINAPI MH_EnableHook(LPVOID pTarget)
MH_STATUS WINAPI MH_DisableHook(LPVOID pTarget)
MH_STATUS WINAPI MH_Uninitialize(VOID);
|
Hook初始化
在初始化前呢,我们应当明确需要拦截的地方,这里就不得不提到ws2_32.dll这个文件了。
ws2_32.dll是Windows Sockets API的实现,通常网络通信都会用到它,以Flash端为例,数据传输的过程中通常会调用send和recv方法,因此我们只需要拦截这两个方法即可。
根据MinHook提供的初始化办法,我们需要获取:
pTarget:需要替换的目标函数地址。 pDetour:我们自己创建的函数地址。ppOriginal:用于保存原始函数指针(方便绕过Hook)。
1
2
3
4
5
6
7
8
9
10
11
|
HMODULE ws2_32 = nullptr;
ws2_32 = GetModuleHandleW(L"ws2_32");
LPVOID targetSend = reinterpret_cast<LPVOID>(GetProcAddress(ws2_32, "send"));
LPVOID targetRecv = reinterpret_cast<LPVOID>(GetProcAddress(ws2_32, "recv"));
decltype(&recv) originalRecv = nullptr;
decltype(&send) originalSend = nullptr;
|
管道
别着急,捕获数据前还需要了解一个知识点:管道。
先明确我们的需求:
假设,我们创建了一个DLL用于注入游戏进程来捕获数据包,然后,我们另有一个程序,需要对捕获到的数据包进行处理,那么问题来了,另一个程序是怎么得到DLL捕获到的数据包呢?
相信你也知道答案了,当然是借助管道这个工具。
OK,那么什么是管道?
管道(Pipe)是操作系统中一种非常基础且重要的进程间通信机制。管道的本质是一个共享的、特殊的文件或内核缓冲区。它允许一个进程将数据写入这个缓冲区,而另一个进程从这个缓冲区读取数据。数据在管道中以字节流的形式单向流动。(AI如是说)
通常呢,管道分为匿名管道与命名管道。匿名管道一般是用作具备亲缘关系的进程之间使用的,而命名管道是用作没有亲缘关系的进程之间通信的。
管道有些类似数据和结构中的队列,它采用的是先进先出的顺序,并且它是单向的。
很显然,我们这里需要使用命名管道。
具体实现就不说了,直接看源码。
数据捕获
经历了那么多,终于可以开始捕获数据了,这里就以捕获接收包为例子(为了方便理解,这里没有使用管道):
1
2
3
4
5
6
7
8
9
10
11
12
13
14
15
16
17
18
19
20
21
22
|
int WINAPI RecvEvent(SOCKET S, char *BufferPtr, int Length, int Flag)
{
int Result = OriginalRecv(S, BufferPtr, Length, Flag);
if (g_hookEnabled && Result > 0)
{
std::lock_guard<std::mutex> lock(g_DataMutex);
std::vector<char> Temp(BufferPtr, BufferPtr + Result);
PacketProcessor::ProcessRecvPacket(S, Temp, Result);
}
return Result;
}
|
开始处理数据包!
现在接收到数据后,就需要想办法对数据进行处理了。
首先我创建了PacketProcessor类,用于处理这些数据。
1
2
3
4
5
6
7
8
9
10
11
12
13
14
15
16
17
18
19
20
21
22
23
24
25
26
27
28
29
30
31
32
33
34
| struct PacketData
{
int32_t Length;
uint8_t Version;
int32_t CmdID;
int32_t UserID;
int32_t SN;
std::vector<uint8_t> Body;
void LogCout(bool bIsSend) const;
};
class PacketProcessor
{
public:
static void ProcessRecvPacket(SOCKET Socket, const vector<char> &Data, int Length);
static PacketData ParsePacket(const vector<uint8_t> &Packet);
static bool ShouldDecrypt(const vector<uint8_t> &Cipher);
static vector<uint8_t> DecryptPacket(const vector<uint8_t> &Cipher);
static void Logining(PacketData &InPacketData);
private:
static vector<uint8_t> s_RecvBuf;
static size_t s_RecvBufIndex;
static size_t s_RecvBufLen;
static size_t s_RecvNum;
static SOCKET s_CurrentSocket;
static bool s_HaveLogin;
static size_t s_SN;
static int32_t s_UserID;
};
|
在介绍最关键的ProcessRecvPacket前呢,需要先了解一些基础知识:粘包和拆包、大端和小端。
粘包和拆包
在使用TCP协议进行数据传输的过程中,TCP会将发送方的数据存储在缓冲区中,并根据网络状况优化数据包的大小进行传输,也就是说,TCP一次传递报文段可能由多个小的数据包组成,接收方接收时就可能出现多个数据包“粘”在一起的现象,这种情况就是粘包;同样的,如果单个数据包过大,超过了TCP 报文段的最大传输单元,那么TCP会将这个大的数据包拆分,并分为多个报文段进行传输,这样就造成了拆包。
大端和小端
大小端是多字节数据的存储方式,它决定一个多字节类型在内存中按照什么顺序存放各个字节。
简单来说,对于作为正常人的我们来说,对于123这个数字,我们都会将其读作“一百二十三”,也就是大端,即高位在前,低位在后;但是,处理器不这么认为,它是怎么读的呢?
“三百二十一”
也就是说,它与正常人读取的方式完全相反,高位在后,低位在前。下方是比较专业的例子:
1
2
3
4
5
| 整数 0x12345678 的字节排列:
地址: 0x00 0x01 0x02 0x03
大端: 0x12 0x34 0x56 0x78
小端: 0x78 0x56 0x34 0x12
|
ProcessRecvPacket
先贴代码
1
2
3
4
5
6
7
8
9
10
11
12
13
14
15
16
17
18
19
20
21
22
23
24
25
26
27
28
29
30
31
32
33
34
35
36
37
38
39
40
41
42
43
44
45
46
47
48
49
50
51
52
53
54
55
56
57
58
59
60
61
62
63
64
65
66
67
68
69
70
71
72
73
| void PacketProcessor::ProcessRecvPacket(SOCKET Socket, const vector<char> &Data, int Length)
{
PacketData RecvPacketData = PacketData();
s_RecvBuf.insert(s_RecvBuf.end(), Data.begin(), Data.begin() + Length);
if (s_CurrentSocket != Socket)
{
s_RecvBufIndex += Length;
if (s_RecvBufIndex == s_RecvBuf.size())
{
s_RecvBuf.clear();
s_RecvBufIndex = 0;
}
return;
}
while (true)
{
size_t Remain = s_RecvBuf.size() - s_RecvBufIndex;
if (Remain < sizeof(uint32_t))
break;
uint32_t PacketLength = 0;
memcpy(&PacketLength, &s_RecvBuf[s_RecvBufIndex], sizeof(PacketLength));
PacketLength = ntohl(PacketLength);
if (Remain < PacketLength)
break;
vector<uint8_t> Cipher(s_RecvBuf.begin() + s_RecvBufIndex, s_RecvBuf.begin() + s_RecvBufIndex + PacketLength);
vector<uint8_t> Plain = ShouldDecrypt(Cipher) ? DecryptPacket(Cipher) : Cipher;
RecvPacketData = ParsePacket(Plain);
++s_RecvNum;
RecvPacketData.LogCout(false);
if (RecvPacketData.CmdID == 1001)
{
Logining(RecvPacketData);
s_CurrentSocket = Socket;
s_SN = RecvPacketData.SN;
s_UserID = RecvPacketData.UserID;
s_HaveLogin = true;
}
s_RecvBufIndex += PacketLength;
if (s_RecvBufIndex == s_RecvBuf.size())
{
s_RecvBuf.clear();
s_RecvBufIndex = 0;
break;
}
if (s_RecvBufIndex > 0)
{
s_RecvBuf.erase(s_RecvBuf.begin(), s_RecvBuf.begin() + s_RecvBufIndex);
s_RecvBufIndex = 0;
}
}
}
|
私以为其中的重点为粘包、拆包以及登录包的处理的解决方法。
先说粘包和拆包:
1
2
3
4
5
6
7
8
9
10
11
12
13
14
15
16
17
18
19
20
21
22
23
24
25
26
27
28
29
30
31
32
33
34
35
36
37
38
39
40
41
42
43
44
45
46
47
48
49
50
| while (true)
{
size_t Remain = s_RecvBuf.size() - s_RecvBufIndex;
if (Remain < sizeof(uint32_t))
break;
uint32_t PacketLength = 0;
memcpy(&PacketLength, &s_RecvBuf[s_RecvBufIndex], sizeof(PacketLength));
PacketLength = ntohl(PacketLength);
if (Remain < PacketLength)
break;
vector<uint8_t> Cipher(s_RecvBuf.begin() + s_RecvBufIndex, s_RecvBuf.begin() + s_RecvBufIndex + PacketLength);
vector<uint8_t> Plain = ShouldDecrypt(Cipher) ? DecryptPacket(Cipher) : Cipher;
RecvPacketData = ParsePacket(Plain);
++s_RecvNum;
RecvPacketData.LogCout(false);
if (RecvPacketData.CmdID == 1001)
{
Logining(RecvPacketData);
s_CurrentSocket = Socket;
s_SN = RecvPacketData.SN;
s_UserID = RecvPacketData.UserID;
s_HaveLogin = true;
}
s_RecvBufIndex += PacketLength;
if (s_RecvBufIndex == s_RecvBuf.size())
{
s_RecvBuf.clear();
s_RecvBufIndex = 0;
break;
}
if (s_RecvBufIndex > 0)
{
s_RecvBuf.erase(s_RecvBuf.begin(), s_RecvBuf.begin() + s_RecvBufIndex);
s_RecvBufIndex = 0;
}
|
我创建了多个全局变量用于处理上述问题:
s_RecvBuf:接收缓冲区,用于缓存接收来的数据流。s_RecvBufIndex:当前处理到的接收缓冲区索引。
大致流程如下:
- 判头长,先判断包头长度是否足够,不够则继续等待新的包。
- 读包头,将网络字节序(大端)转换为机器读法(小端)得到包长。
- 判包长,判断当前缓冲区的包是否完整,不完整继续等。
- 分析包,提取完整的数据包,进行解密分析。
- 清库存,更新缓冲区的状态,确保不会影响下一轮的分析。
再说登陆包的处理:
1
2
3
4
5
6
7
8
| if (RecvPacketData.CmdID == 1001)
{
Logining(RecvPacketData);
s_CurrentSocket = Socket;
s_SN = RecvPacketData.SN;
s_UserID = RecvPacketData.UserID;
s_HaveLogin = true;
}
|
非常的清晰,如果命令号为1001,就代表此时为登录包,然后依照官方处理方法,对key进行处理。
1
2
3
4
5
6
7
8
9
10
11
12
13
14
15
16
17
18
19
20
21
22
23
24
25
26
27
28
29
| void PacketProcessor::Logining(PacketData &InPacketData)
{
if (InPacketData.Body.size() < 4)
{
return;
}
size_t n = InPacketData.Body.size();
uint32_t tail4 = (static_cast<uint32_t>(InPacketData.Body[n - 1])) | (static_cast<uint32_t>(InPacketData.Body[n - 2]) << 8) | (static_cast<uint32_t>(InPacketData.Body[n - 3]) << 16) | (static_cast<uint32_t>(InPacketData.Body[n - 4]) << 24);
uint32_t xorRes = tail4 ^ static_cast<uint32_t>(InPacketData.UserID);
std::string plain = std::to_string(xorRes);
MD5 md5;
md5.update(reinterpret_cast<const uint8_t *>(plain.data()), plain.size());
md5.finalize();
std::string md5hex = md5.hexdigest();
std::string key = md5hex.substr(0, 10);
Cryptor::InitKey(key);
}
|
然后,我们就得到的关键道具:key。在这之后呢,所有的数据包的解密都会用到key,现在我们可以随意地捕获并解密封包了。
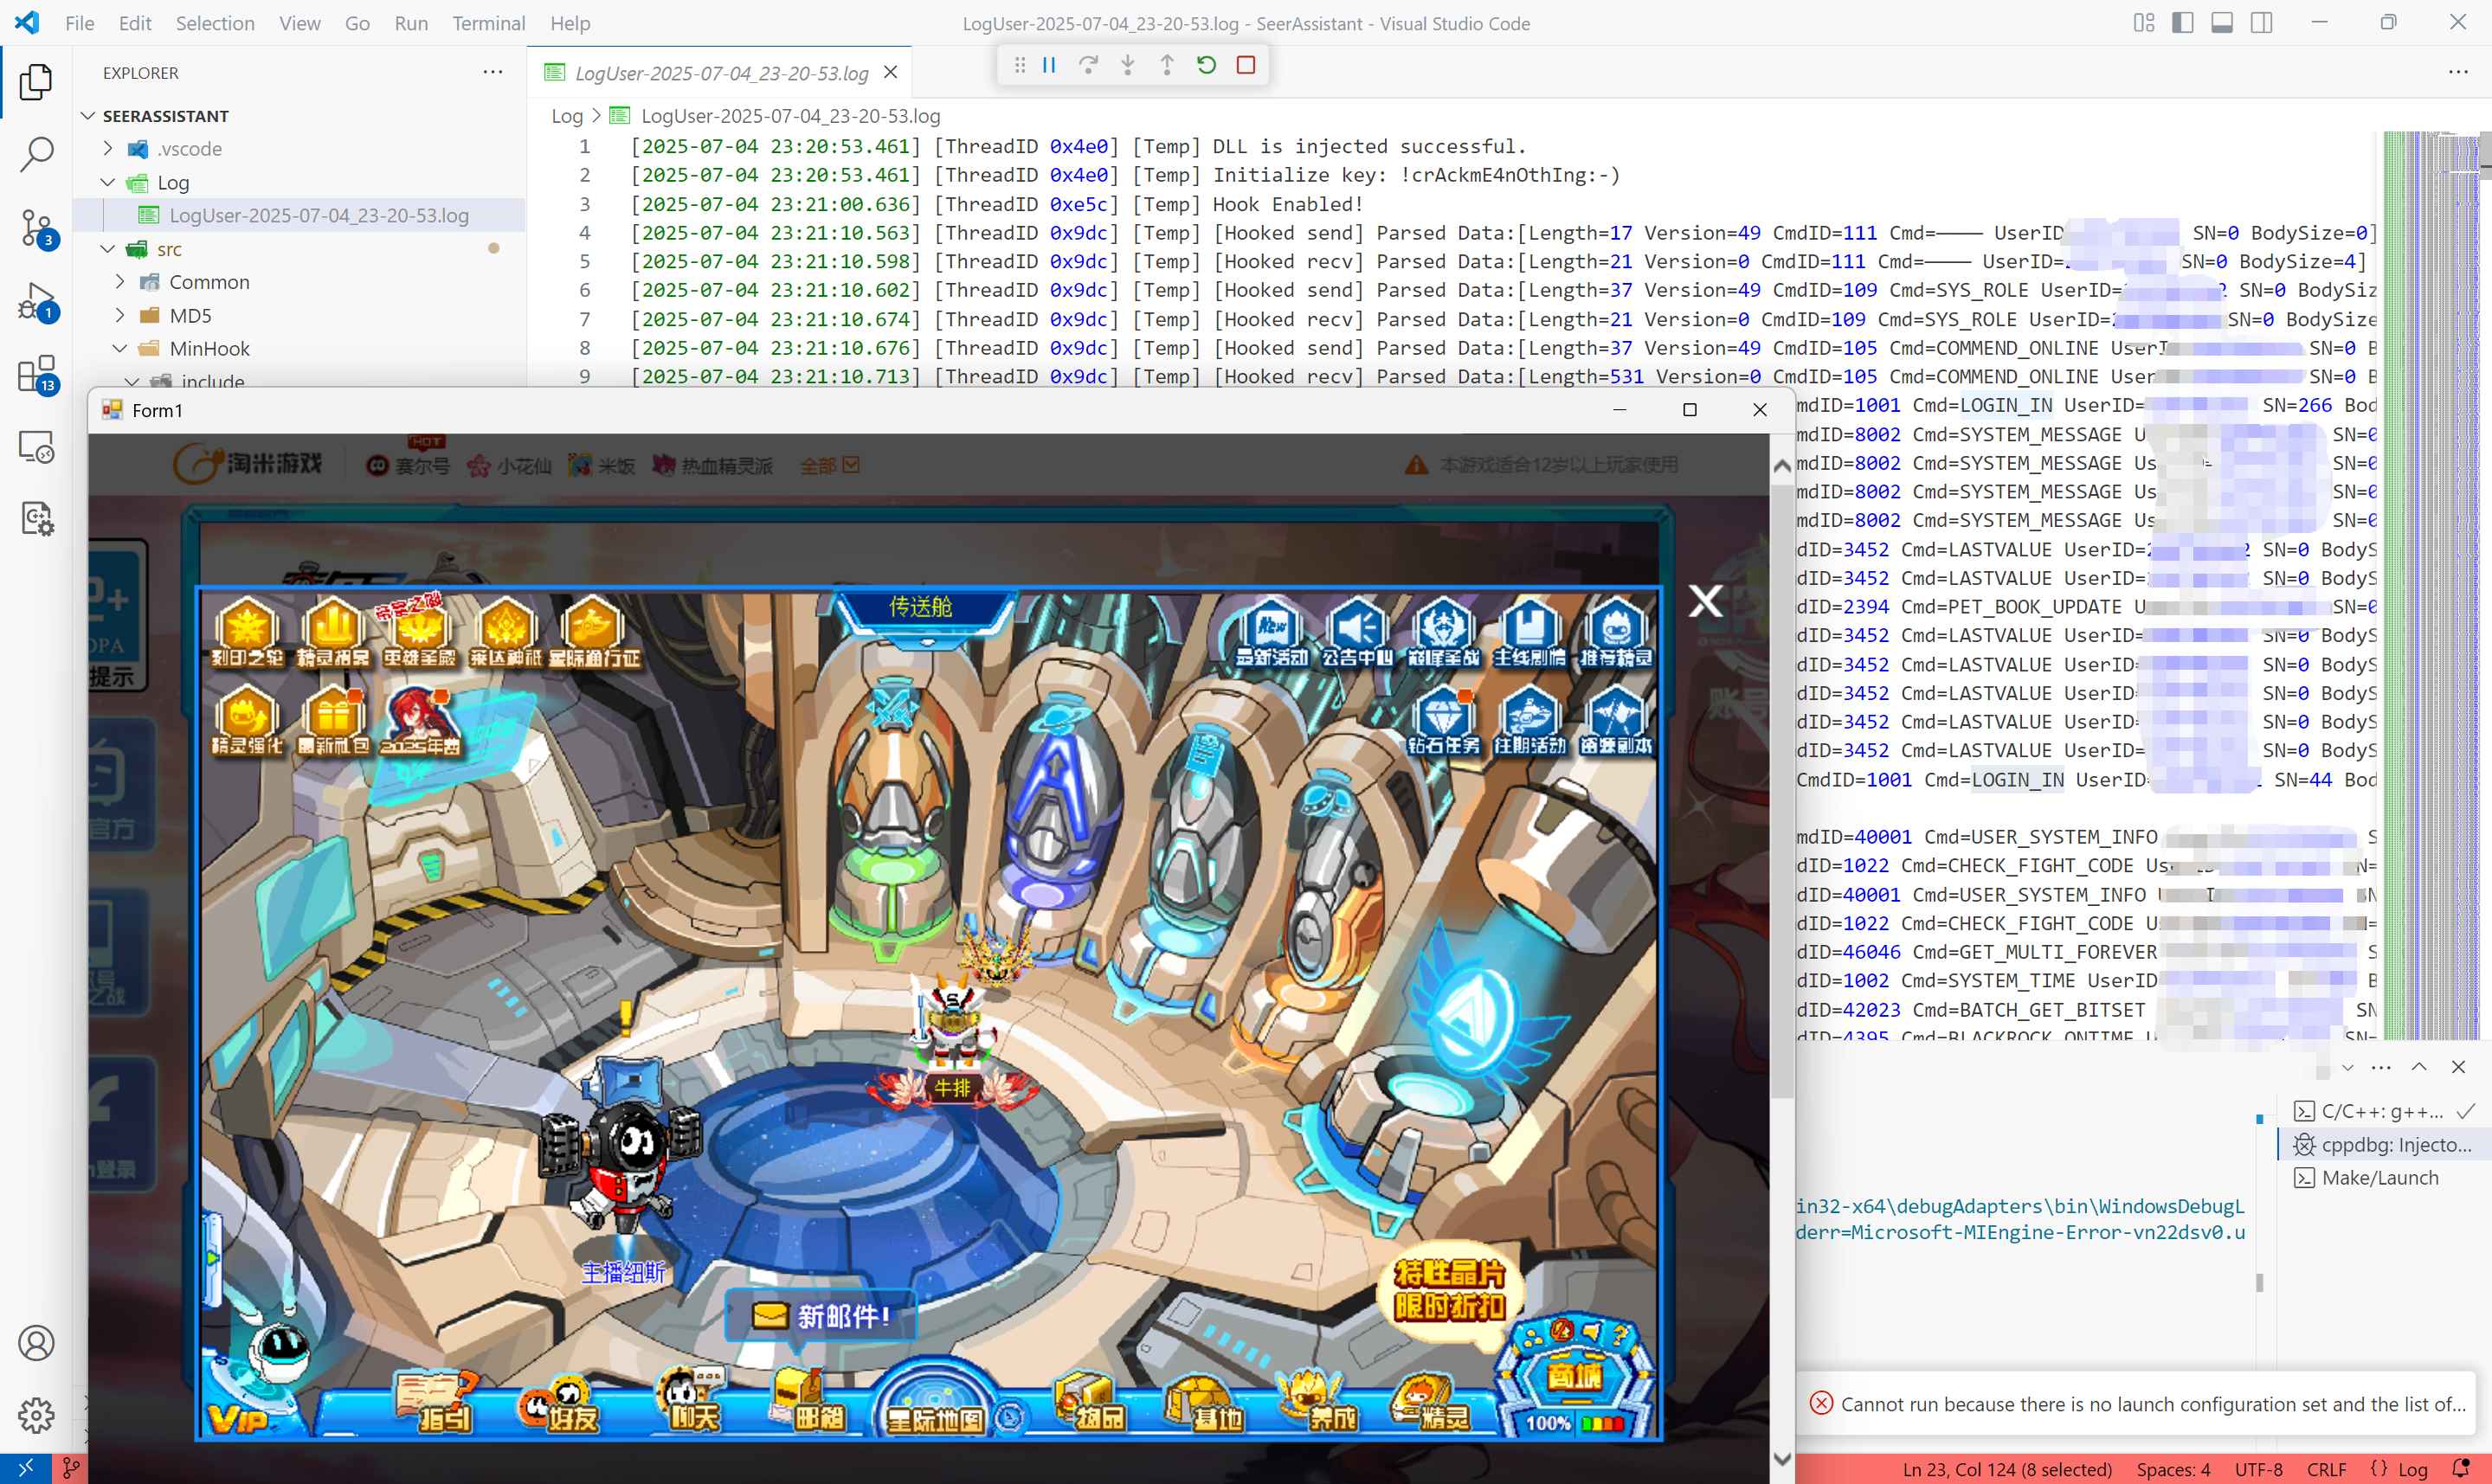
测试
登录阶段,可以看到LOGIN_IN指令分别进行了一次发送与一次接收。
尝试移动一下,可以看到PEOPLE_WALK分别被发送和接收了一次,至于日志中为什么是两次,因为第一次没截好图。
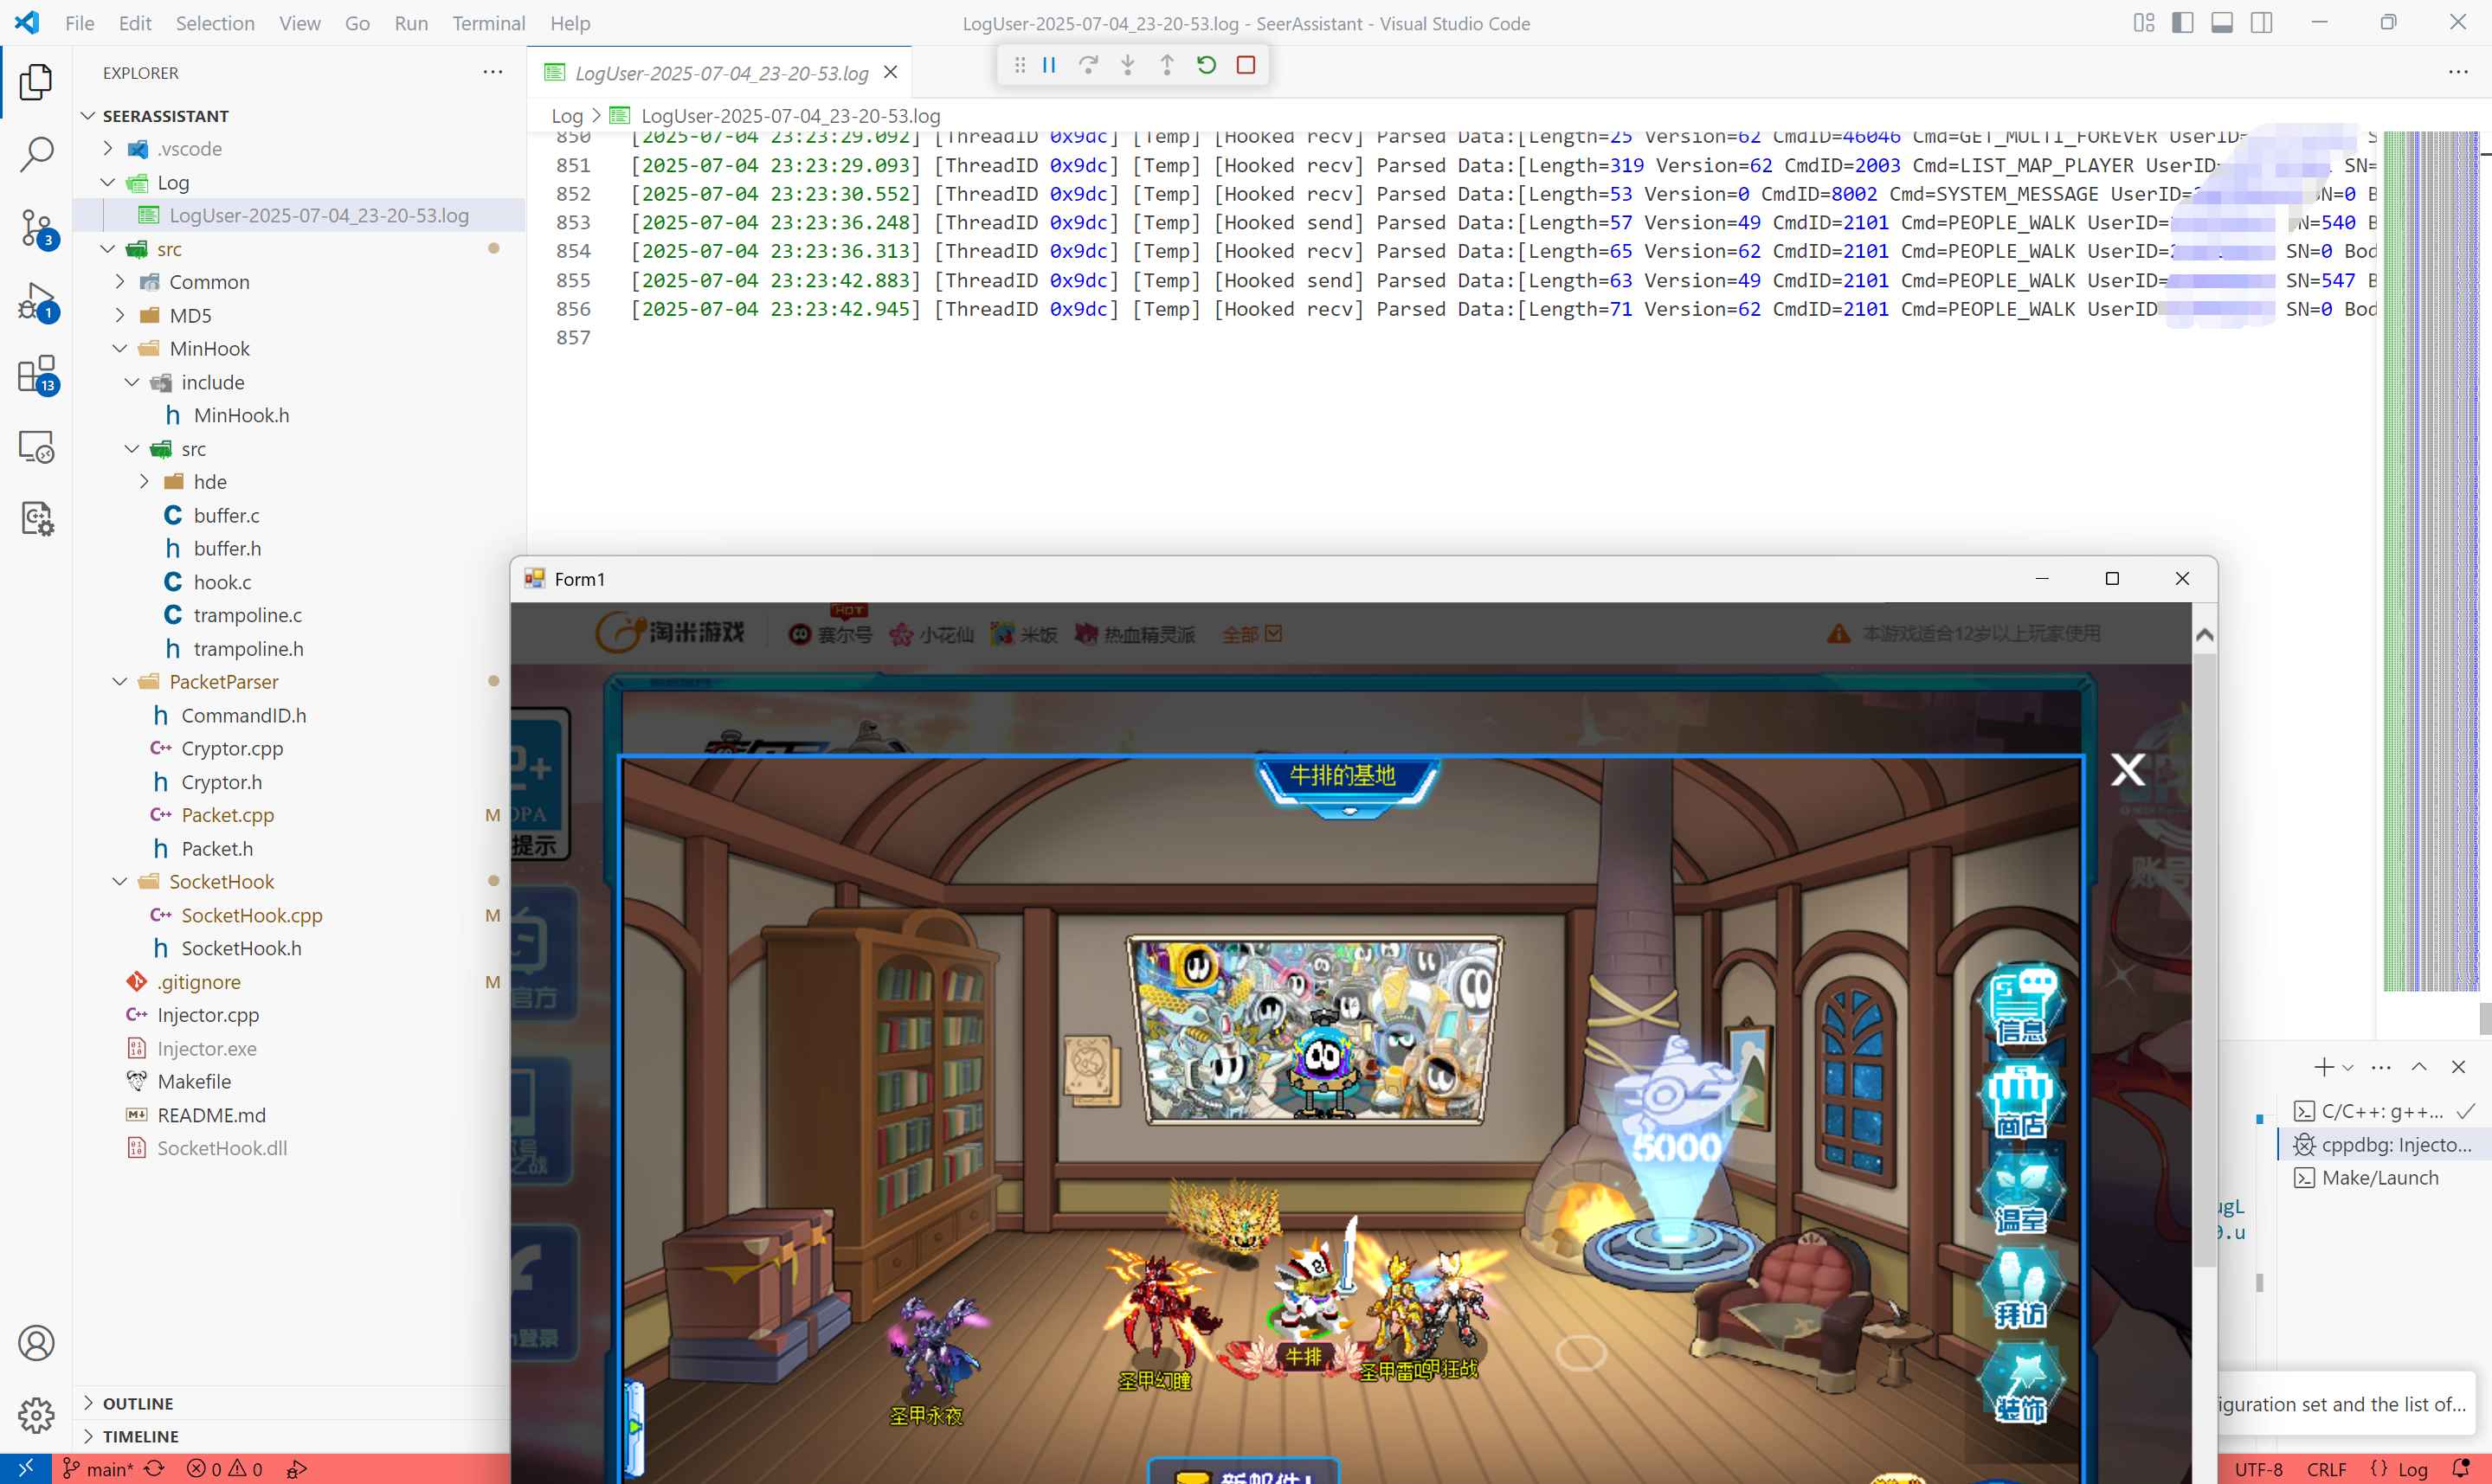
那么到这里,封包解密基本结束了,下面进入第二阶段:
“对战信息捕获与UI展示”
这部分就自行研究吧!
最后
本文仅用于技术研究与学习交流,请勿用于任何商业用途。
所有相关资源版权归上海淘米网络科技有限公司所有。
如因滥用本文造成法律纠纷,责任由使用者自行承担。
本文参考自赛尔号:通信协议逆向与模拟&中间人攻击窃取登录凭证
联系方式
邮箱:584485321@qq.com
那么最后,赛尔号见!!!